9 Yoga Poses That Support Your Knee Injury Recovery
Knee injury recovery can be daunting, painful and uncertain. However, it doesn’t have to be! Yoga (yes, there is yoga for knee injuries!) is a great tool you can use to help strengthen and lengthen the muscles surrounding the knee, helping aid in your recovery post-injury.
After tearing my ACL and going through surgery to repair my knee, I felt lost and unsure about my recovery process. Luckily, I found yoga, and it helped me increase the mobility, strength and flexibility in my leg post-surgery.
In addition to physical therapy, yoga was a gentle and safe way to help build confidence back in my body.
Yoga can be helpful for recovering from so many different injuries, and the knee is no exception.
Yoga for Knee Injuries – Use These 9 Poses to Help in Your Knee Injury Recovery:
Based on my own recovery and anatomical knowledge as a yoga teacher and personal trainer, I put together a list of the top nine yoga postures that had the most impact on my knee injury recovery.
Depending on your injury, these postures can be done anywhere from two weeks to two and a half months post-injury. Make sure to enter each posture slowly and mindfully!
Practice These 10 Yoga Poses to Relieve Knee Pain
Modifications are provided for all levels. First, seated postures are offered. Then, for those who are able to put weight on the leg of their injured knee, there are standing postures listed to help increase strength and stability in the legs.
Recovering from knee injuries requires a lot of patience and compassion. Healing is not linear, and each person’s recovery journey is unique. Pease make sure to consult with your doctor or physical therapist on whether these postures are safe for you to do.
1. Locust Pose (Salabhasana)
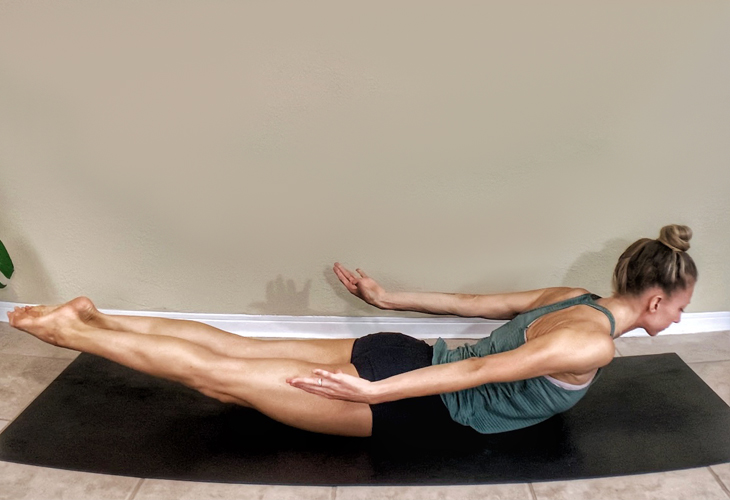
Locust Pose is great for strengthening your lower back muscles and activating the muscles in your lower body. This helps create stability in the back body to best support your knee(s).
To create more comfort, place a blanket or something soft under your injured knee.
Let’s try it:
- Begin by laying on the ground on your belly
- Rest one side of your face on the ground and place your arms by your side with your palms facing up
- On an inhale, lift your chest and your arms off the ground and bring your shoulder blades closer together
- Keep your neck neutral by slightly pulling your chin down toward your chest
- You can stay here for five deep breaths without activating the lower body, or continue to the next step
- Squeeze your feet and legs together and activate your glutes and quads
- Keeping your legs straight and feet together, use your lower back muscles to slowly lift your legs off the ground
- Stay here for five slow, deep breaths, continuously lifting your chest and legs higher on every inhale
- After five breaths, release your limbs back to the floor and place the opposite side of your face on the ground
- Rest for a few breaths, and repeat two to three more times
2. Seated Forward Fold (Paschimottanasana)
Forward folds are great yoga for knee injury poses because they help relieve tension in the lower back and behind the knees by increasing flexibility in your hamstrings and calves.
You should feel the stretch in your lower back, calves and/or middles of the back of your legs.
Let’s try it:
- Begin sitting up on the ground with your legs in front of you
- Modification: place a towel or pillow underneath your knees
- Bend your knees, keeping your toes flexed and facing up toward the sky
- Sit up as straight as you can and slightly scooch your hips back
- Leading with your chest, begin to fold over your legs, reaching for your shins or toes.
- Allow your head to relax as you fold forward and release any tension in your face and neck
- Take five slow breaths, allowing yourself to go deeper into the stretch with every exhale
- For a deeper stretch, slowly straighten your legs out a little more on each breath by inching your heels forward. You can also pull your toes toward you for a deeper stretch in your calves
- To come out, release your legs/feet and slowly lift your head and neck up
- Rest for a few breaths, and repeat two to three more times
3. Head-to-Knee Pose (Janu Sirsasana)
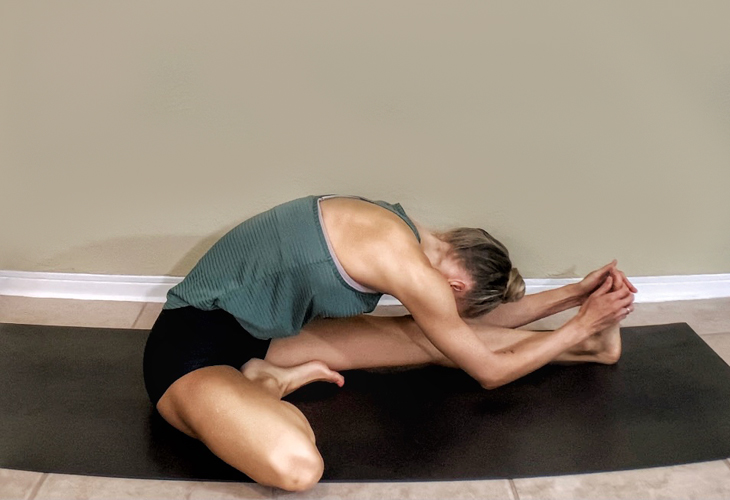
This yoga for knee injuries pose helps open up your lower back, hips and hamstrings. By creating more space in these areas of your body, it can reduce tension and stress on your knees to aid in your knee injury recovery.
For a modification, place a pillow under one or both knees.
Let’s try it:
- Begin seated with your legs extended out in front of you
- Hug your right knee in towards your chest as comfortably as you can with your range of motion, then gently drop your knee to the side. The bottom of your right foot should be touching the inside of your left leg
- Sit up straight, bend your left leg, and begin to fold over your left leg
- Fold forward as far as you can, then relax your head and neck
- To go deeper, slowly inch your left heel forward to straighten out your leg
- Hold for five to ten deep breaths
- To come out, gently bring your body upright and straighten out your right leg
- Repeat two to three times on each side
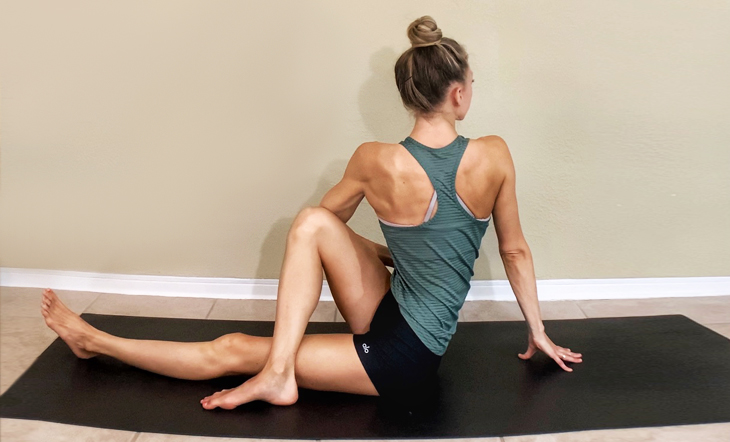
4. Seated Twist (Ardha Matsyendrasana)
A seated twist can help open up your spine, shoulders and side body. This helps free up any tightness in the muscles attached to the hip, which can cause restricted movement down your legs to your knee(s).
Let’s try it:
- Begin sitting up with both of your legs extended out in front of you
- Bend your right leg and cross it over top of your left leg, placing your foot just outside and above your left knee
- Sit up as straight as you can, and place your right arm behind you
- Lift your left arm up toward the sky, and slowly begin to twist your torso to the right
- Place the outside of your left tricep on the outside of your right knee, leveraging it to help you twist a little deeper
- If you are unable to twist this deep, you can place your left hand on your right shin and continue to gently twist
- On every inhale, think about sitting up a little straighter
- On every exhale, twist just a little bit more
- Stay here for five to ten deep breaths
- With control, gently unwind and bring your torso back to center
- Straighten your right leg and come back to your starting position
- Repeat on the other side
10 Yoga Poses to Strengthen Your Knees and Prevent Injury
5. Reclined Knee-to-Chest (Ardha Apanasana)
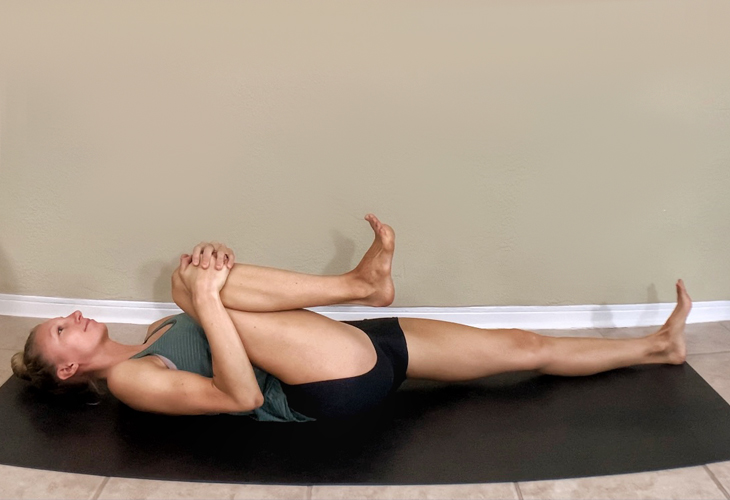
This posture helps gently ease you back into improving your range of motion in your knee(s), stabilizes the pelvis and stretches your lower back so it’s excellent for knee injury recovery.
By going slowly, you give the muscles surrounding the knee joint space to relax and open up.
Let’s try it:
- Begin by lying flat on your back with your legs extended and your arms by your side
- Slowly bend your right knee and place your hands on the front of your shin
- Gently guide your knee up, hugging it towards your chest as far as it can go
- You can slide your forearms under your knee (between your hamstrings and calve muscles) to create more space in the knee joint
- Scan your body to see if you are holding tension in any area. Relax and release those areas
- Stay here for five breaths before releasing and extending your leg back to the ground
- The key here isn’t to force your knee into deeper range of motion – it’s to go slowly and allow your body to relax and open up in its own time
- Repeat on the other side
6. Chair Pose (Utkatasana)

Chair Pose is an excellent yoga for knee injuries posture because it helps strengthen the quadriceps, hips and glutes, creating more stability in the knees. The lower you go, the more strength you will build.
Keep your hips higher with less bend in your knees for a lower intensity.
Let’s try it:
- Begin in Mountain Pose with your feet hips-distance apart and your arms by your side
- Step your feet together, and lift your arms up toward the sky
- Modification: keep your hands at your heart or on your hips
- Begin to lower your hips down and back, like you are about to sit on a chair
- Shift your weight more into your heels, keeping your hips low
- You should be able to peek over your knees at your toes, so shift your hips back a little if you can’t see them
- Slightly tuck your tailbone under to engage your lower core
- Keep your chest lifted and your shoulders pulled down and back
- Take five deep breaths
- Slowly straighten your legs and release your arms by your sides to come out of the pose
7. Crescent Lunge
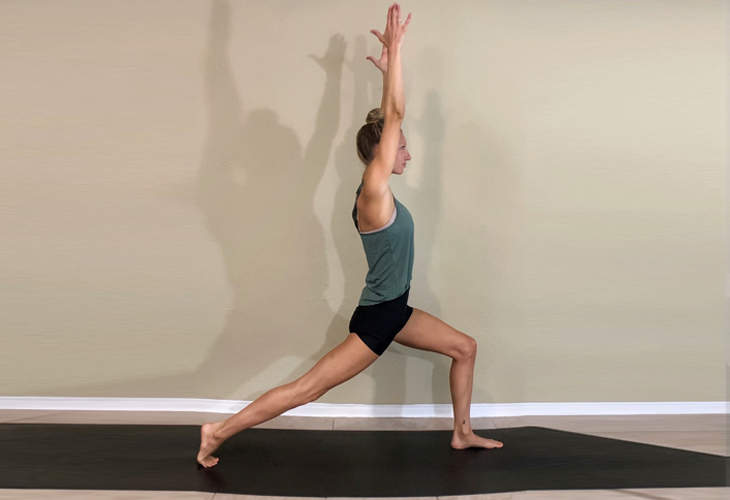
Crescent Lunge is a pose you may want to save until you are a little farther down the road in your knee injury recovery.
This posture helps support the knee by building strength in the inner thighs, quads and glutes, but can put added stress on the knee before it’s ready. Ease into this pose and only go as far your knee can handle.
Let’s try it:
- Begin in Mountain Pose with your feet hip-distance apart, arms by your sides, and both feet facing forward
- Take a step back with your left leg, about three to four feet
- Keep your right knee in line with your right ankle, tracking your knee toward your pinky toe
- If this is too intense, don’t bend your knee as much and/or use a wall or chair for support
- Lift your back heel off the ground and come high on your left toes
- Place your hands on your hips and use them to guide your hips so they are both facing forward in one straight line
- Activate the muscles in your back leg to get your leg as straight as you can
- Bring your hands to your heart center, or lift your arms up toward the sky
- Soften your shoulders and release any tension you may be holding in your face or upper body
- Breathe seven long, slow, deep breaths
- To come out, push off of your back foot and come back to Mountain Pose
- Repeat two to three times on both sides
8. Tree Pose (Vrksasana)

Tree Pose is an excellent pose to build strength in the entire lower body – ankles, calves, quads and hips, which makes it perfect for knee injury recovery.
By strengthening your lower body, you create more strength and support for your knee(s).
Let’s try it:
- Begin in Mountain Pose with your feet hip-distance apart and your arms by your sides
- Shift a little more weight into your right foot, securing yourself so you feel grounded and balanced
- Use a wall or chair to hold onto to help you balance. Over time, you can progress to no support as your balance and strength improves
- Begin to bend your left knee and swivel it to the left, opening up your hip
- Depending on your hip mobility and where you are in your knee injury recovery, you can come high on your left toes and keep the bottom of your foot on the inside of your ankle
- You can also slide your foot up to the inside of your calf or place it on the inside of your inner right thigh, avoiding direct compression to the right knee to protect the joint
- Make sure you are not locking out your right knee – if you hyperextend in your joints, make sure to keep a slight bend in your right leg
- Find your drishti (a point you can place your focus on) and take five to ten breaths
- To come out of the pose, slowly release your left foot with control back to the ground
- Repeat on both sides two times
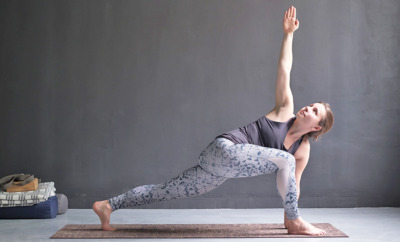
9. Side Angle Pose (Parsvakonasana)
Side Angle Pose is another yoga for knee injuries posture that you may want to hold off on doing until later in your knee injury recovery.
This pose can put pressure on the knee if you don’t have the strength in your lower body and core to support. A shorter stance will feel more comfortable and puts less pressure on your back (straight) leg; additionally, you can alleviate pressure by aligning your back heel to a wall.
When you feel you are ready, this posture can really strengthen the inner thighs, quads and hips, building more support for the knee.
Let’s try it:
- Begin in Mountain Pose with both feet facing forward
- Take a step back with your left leg, about three to four feet, and turn your back foot to the left, placing it at a 90-degree angle
- Depending on which feels best for you, line your heel or arch of your back foot in line with the heel of your front foot
- Keep a deep bend in your front leg so your right knee is in line with your right ankle
- If you feel your right knee caving inward, push your knee out so that it tracks more toward your pinky toe
- Shift a little more weight to the outer edge of your back foot to find a balance between the weight in your front and back leg
- Keep your back leg as straight as you can by squeezing your quad. It’s okay to keep a slight bend if this is too much pressure on your back knee
- Extend your right arm forward and your left arm back, coming into a Warrior II position with your hands in line with your shoulders
- Keeping your lower body exactly where it is, extend your torso forward and place your right elbow on the inside of your right leg
- Try not to place too much weight on your leg – use your core to keep you lifted
- If you need additional support, place a block on the inside of your right foot and place your hand on the block
- Lift your left arm up to the sky, and look at your hand
- Hold for five deep breaths
- To come out, begin to straighten out your right leg
- Lift your torso up, push off of your back foot, and step forward into Mountain Pose
- Repeat on both sides two times
Use Yoga for Knee Injuries to Help Your Knee Injury Recovery
Great job! Remember to be gentle, go slow, and ask your body what it needs.
By practicing these yoga for knee injuries postures and following the guidance of your doctor, your knee will recover and feel stronger than ever in no time!
All included information is not intended to treat or diagnose. The views expressed are those of the author and should be attributed solely to the author. For medical questions, please consult your healthcare provider.










Comments